Tips on preparing a great fabric label design
Posted by Gus Svab on

Printer resolution:
Material:
Material roughness goes like this (on average, but can vary by thread density):
Print resolution
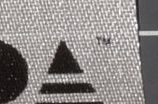
1mm TM symbol on a 25mm Satin label
Size matters
But why do I have to know all this?
As a general rule of thumb:
- Easy logo with a couple of words, or a one word brand -> woven label or small satin strip
- Complex logo, a fair amount of text, with care instructions -> mid-large size satin strip digitally printed
- High text density, warning labels where readability is paramount -> Digitally printed nylon
- Fine art print with lots of detail in vivid multi-colour finish -> flexographic print on satin
Export - parting ways with your artwork
This is the last step where you are directly involved in the creation process, but just as important as the rest.
There are times when you can't produce a vector (maybe you don't have one in the first place, your designer doesn't give it to you, or you can't send it over due to licensing limitations), in this case your only option is to export to bitmap. Most printers will accept PNG or JPG, just make sure that the export resolution is high enough so nothing is lost when your design is imported on the far end, and needs to be scaled!
Here is a handy checklist that you or your designer can follow when submitting artwork for printing:
vector:
- ask what format is supported
- convert text to outlines (ai) or paths (inkscape) or embed fonts if licence allows
- make sure, that any embedded rasters are 300+ dpi (aim for 600)
bitmap export:
- make sure the vector is scaled up to at least your print size
- export with at least 300 dpi resolution, aim for 600 if possible
- select the highest quality, and choose white background if you can (PNG) avoid compression (JPG)
- don't select any anti-aliasing, or any other post processing option
The same label when exported without (left) and with (right) anti-aliasing

A note on colours:
Depending on the type of label you can have one, a few, or multiple colours in your artwork. When setting up for black on white digital printing (standard care label) make sure that your artwork only contains pure black as a colour. Don't submit a file with a greyscale palette! Same goes for woven labels where usually only a handful of colours are allowed. The AI recolour artwork option will be of help here.
Proofing
As you can see the end product is subject to many factors, and the material you are printing on can make a huge difference, so it is a good idea to factor these in when you are at the proofing process. Some printers will only show you a digital proof, maybe a screenshot of their label designer app, or a pdf. While it will give you an idea of the general layout of things, bear in mind, that an artwork will look sharp on screen most of the times, but can look quite different when applied to texture.
For piece of mind try to get a physical proof if time and your printer allows, or at least a pre-printed sample of the same material/printer.
A good (and time-saving) compromise is to get a high-resolution photo taken of your print and emailed to you.
Disclaimer
We at Naked Labels print care labels on nylon and satin, and while we don't do flexographic prints or woven labels we tried to be totally unbiased in the comparison. We believe, that you should choose the one that best suits your needs and would be happy to advise even if you need a label type that's not in our portfolio.
If you want to know more of our process read this post: http://www.nakedlabels.co.uk/blogs/label-printers-journal/17772149-from-order-to-wash-care
Any questions: please leave a comment, or get in touch at our facebook page: http://facebook.com/finestlabels
Share this post
- 0 comment
- Tags: care, care label, custom labels, design, dpi, fabric, fabric labels, labels, nylon, printing, resolution, satin, setup
0 comment